Toàn bộ series này được tham khảo từ hai nguồn chính: XuanThuLabChanel và DockerDoc. Em xin chân thành cảm ơn sự cống hiến của các tác giả của những kênh nói trên.❤️❤️❤️
Cài đặt, tạo và chạy PHP, phiên bản có PHP-FPM bằng Docker
pull phiên bản image php-fpm từ docker hub
Chúng ta tải bản 7.3-fpm từ docker hub. fpm ở đây có nghĩa là trong gói này, có thêm dịch vụ php-fpm. Dịch vụ này lắng nghe và tạo ra nhiều tiến trình php trên cổng 9000 chờ các webserver như http, nginx kết nối vào.
 1
 2
 3
 4
 5
 6
 7
 8
 9
10
11
12
13
14
15
16
17
18
19
20
21
22
|
❯ docker pull php:7.3-fpm
7.3-fpm: Pulling from library/php
69692152171a: Pull complete
2040822db325: Pull complete
9b4ca5ae9dfa: Pull complete
ac1fe7c6d966: Pull complete
c342d9e76a3c: Pull complete
6ead8e46ae7b: Pull complete
5c98df0d7626: Pull complete
dd302d19deb7: Pull complete
7701b71427d2: Pull complete
672353cf3439: Pull complete
b379e47d0c20: Pull complete
Digest: sha256:d38892103d2f76e3245a080875718d74414d6d7a57cfe7000a91f4aa668f870b
Status: Downloaded newer image for php:7.3-fpm
❯ docker images
REPOSITORY          TAG                 IMAGE ID            CREATED             SIZE
newimage            version2            a8e04dcf8737        2 days ago          170MB
busybox             latest              69593048aa3a        2 days ago          1.24MB
php                 7.3-fpm             2692864592ed        4 weeks ago         399MB
ubuntu              latest              7e0aa2d69a15        6 weeks ago         72.7MB
centos              latest              300e315adb2f        6 months ago        209MB
|
Tạo mạng bridge
Đầu tiên chúng ta tạo một bride network có tên là www-net
1
2
3
4
5
6
7
8
|
❯ docker network create --driver bridge www-net
4d9c8d81da85fd9118cea666265aab88ae6ab71ac1d53a2dd81b168d87c9d290
❯ docker network ls
NETWORK ID          NAME                DRIVER              SCOPE
286d5161c9f6        bridge              bridge              local
0f2ab02aa9f4        host                host                local
271997adaaa9        none                null                local
4d9c8d81da85        www-net             bridge              local
|
Tạo thư mục chia sẻ dữ liệu giữa máy host và container
Trên máy host, ta xây dựng một cây thư mục để lưu trữ dữ liệu chia sẻ với container như sau:
1
2
3
4
5
6
7
|
.
├── docker
│   └── data
│       ├── c1.txt
│       ├── data_container2.txt
│       ├── d.txt
│       └── www
|
Về kiến thức liên quan về chia sẻ dữ liệu giữa máy host và container, bạn có thể xem kĩ hơn ở phần 2
Chạy container php-fpm
Chúng ta tạo một container có tên là c-php
1
2
3
4
5
|
❯ docker run -d --name c-php -v /home/edisc/Desktop/docker/data:/home/SharedData --network www-net php:7.3-fpm
2894c033c93f5e4f2b02198afbb94cc9b5e62467b2e4c1291a7c2444f30659a7
❯ docker ps
CONTAINER ID        IMAGE               COMMAND                  CREATED             STATUS              PORTS               NAMES
2894c033c93f        php:7.3-fpm         "docker-php-entrypoi…"   2 minutes ago       Up 2 minutes        9000/tcp            c-php
|
Ở đây, vì sau khi tạo chúng ta không muốn vào trực tiệp docker nên không dùng tùy chọn -it, tuy nhiên thêm lệnh -d để sau khi tạo docker tiếp tục chạy nền. Ỏ đây, tôi dùng linux nên quá trình diễn ra khá thuận lợi, nhưng theo tác giả thì nếu bạn dùng Windows hay MacOs thì cần phải thiết lập thư mục ở chế độ share với docker thì mới có thể tạo được. Chi tiết bạn có thể vào kênh của anh XuanThuLabChanel để xem rõ hơn. Bên cạnh đó, ta cũng thấy container mới được tạo này chạy đang chạy lệnh “docker-php-entrypoi…”, bản chất lệnh này dùng để gọi dịch vụ php-fpm để chạy và lắng nghe ở cổng 9000.
Kiểm tra php
Chúng ta vào container vừa mới tạo, ôn lại kiến thức cũ, thay vì vào container bằng lệnh docker attach ta còn có một cách khác đó là thực thi câu lệnh bash trong container từ host thông qua docker exec
1
2
|
❯ docker exec -it c-php bash
root@2894c033c93f:/var/www/html#
|
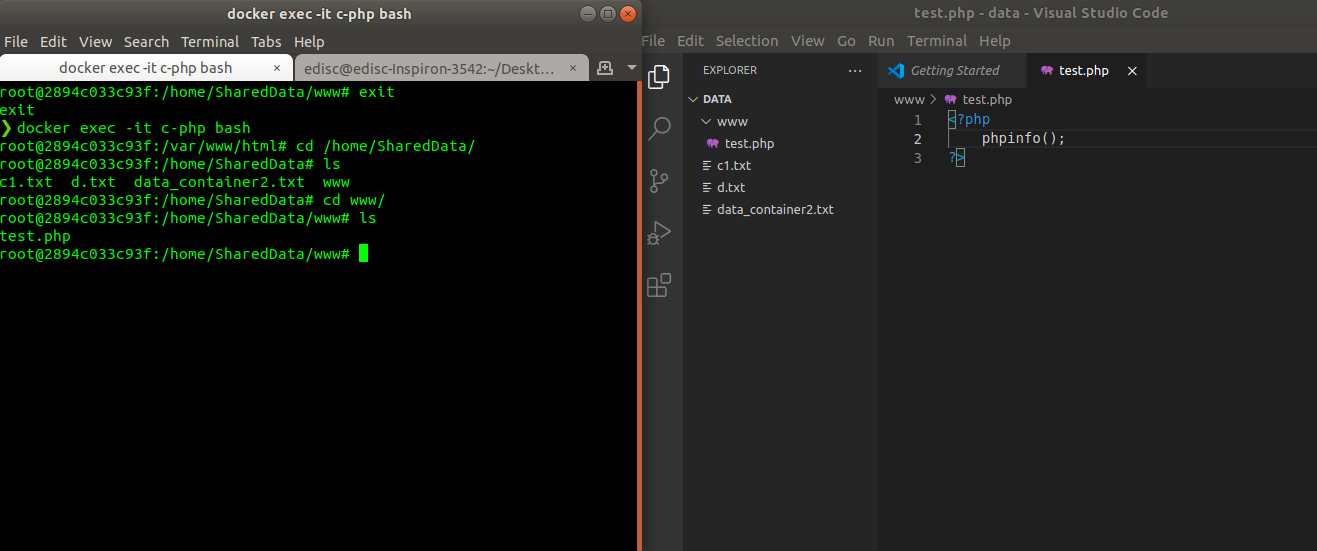
Ta vào thư mục chia sẻ /home/SharedData/ để kiểm tra dữ liệu trên thư mục
1
2
3
4
|
root@2894c033c93f:/var/www/html# cd /home/SharedData/
root@2894c033c93f:/home/SharedData# ls
c1.txt	d.txt  data_container2.txt  www
root@2894c033c93f:/home/SharedData#
|
Trên máy host, ta tạo file test.php trong thư mục www và dễ thấy nó cũng hiện ở trong container.
Tiến hành chạy lệnh file test.php:
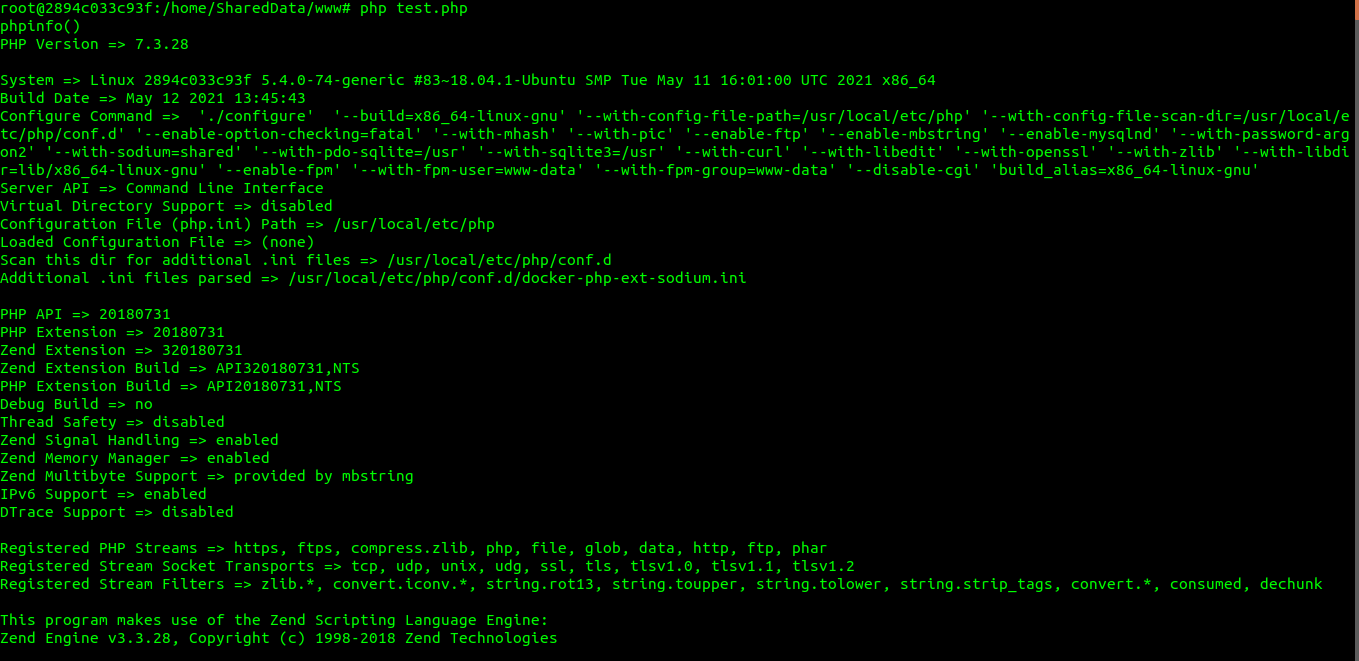
Ta đã chạy được php, php trên container là phiên bản PHP 7.3.28
1
2
3
4
|
root@2894c033c93f:/home/SharedData/www# php --version
PHP 7.3.28 (cli) (built: May 12 2021 13:46:47) ( NTS )
Copyright (c) 1997-2018 The PHP Group
Zend Engine v3.3.28, Copyright (c) 1998-2018 Zend Technologies
|
Cài đặt, chạy Apache HTTPD bằng Docker
Tải image Apache httpd
Chúng ta đã cài conatiner c-php, tiếp theo cài máy chủ httpd. Chúng ta tải image httpd phiên bản mới nhất về với câu lệnh quen thuộc:
 1
 2
 3
 4
 5
 6
 7
 8
 9
10
11
12
13
14
15
16
17
18
|
❯ docker pull httpd
Using default tag: latest
latest: Pulling from library/httpd
69692152171a: Already exists
7284b4e0cc7b: Pull complete
3678b2d55ccd: Pull complete
aeb67982a725: Pull complete
06954f8169fd: Pull complete
Digest: sha256:48bae0ac5d0d75168f1c1282c0eb21b43302cb1b5c5dc9fa3b4a758ccfb36fe9
Status: Downloaded newer image for httpd:latest
❯ docker images
REPOSITORY          TAG                 IMAGE ID            CREATED             SIZE
newimage            version2            a8e04dcf8737        2 days ago          170MB
busybox             latest              69593048aa3a        2 days ago          1.24MB
httpd               latest              39c2d1c93266        2 weeks ago         138MB
php                 7.3-fpm             2692864592ed        4 weeks ago         399MB
ubuntu              latest              7e0aa2d69a15        6 weeks ago         72.7MB
centos              latest              300e315adb2f        6 months ago        209MB
|
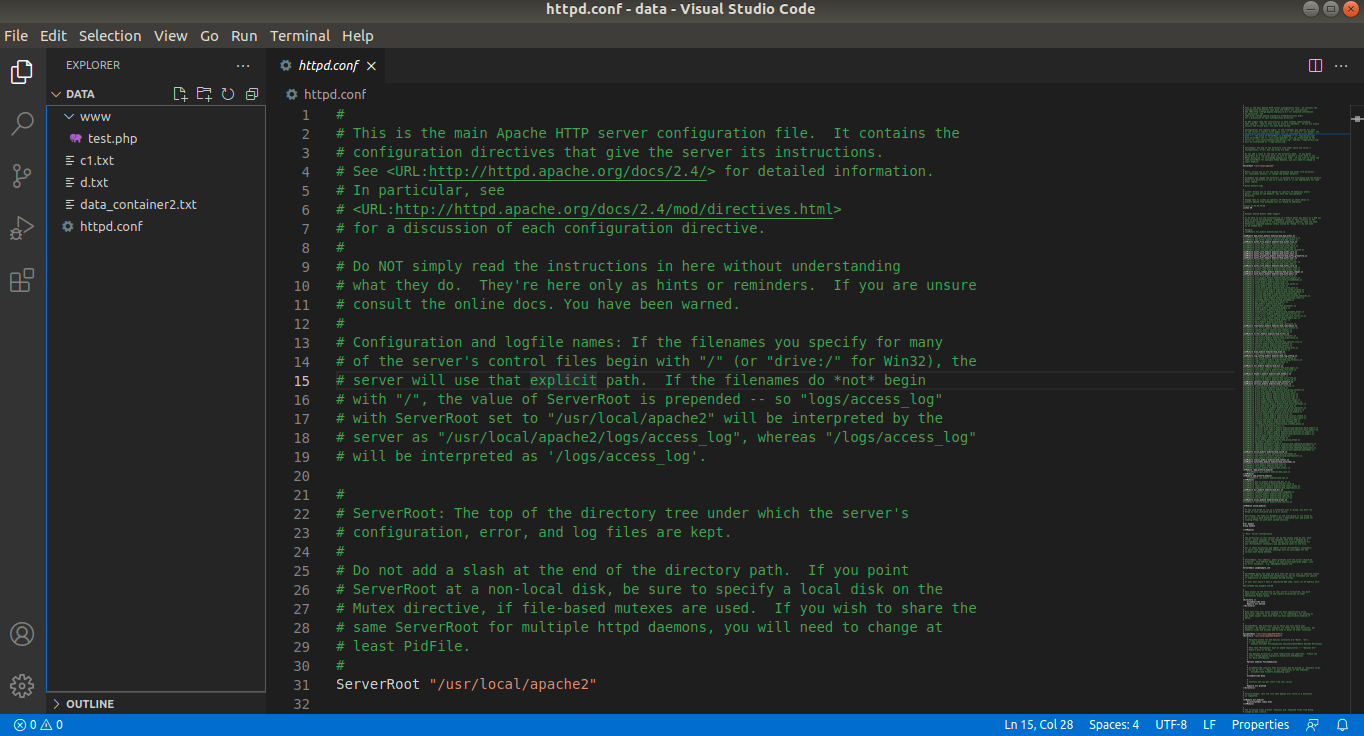
Lấy cấu hình httpd.conf
Khi htppd chạy, nó sẽ nạp file cấu hình trong đường dẫn ở container: /usr/local/apache2/conf/httpd.conf. Do đó, đây cũng là nơi để chúng ta muốn cấu hình tùy chỉnh theo ý muốn của mình.
Đầu tiên, ta sẽ chạy tạm thời container httpd để trích xuất file cấu hình httpd.conf ra máy host trước.
1
|
❯ docker run --rm -v /home/edisc/Desktop/docker/data:/home/SharedData httpd cp /usr/local/apache2/conf/httpd.conf /home/SharedData/
|
Vì chúng ta chạy container này một lần để trích xuất file httpd.conf nên ta thêm tùy chọn --rm để docker sẽ tự động xóa sau khi chạy, bên cạnh đó, khi chạy container ta cũng thực hiện luôn câu lệnh copy file httpd.conf đến thư mục chia sẻ dữ liệu của mình. Sau khi chạy lệnh trên, chúng ta đã có file httpd.conf trên thư mục data ở host.
1
2
|
❯ ls
c1.txt  data_container2.txt  d.txt  httpd.conf  www
|
Cấu hình httpd.conf
Sau khi có được file httpd.conf, ta mở ra và tiến hành cấu hình.
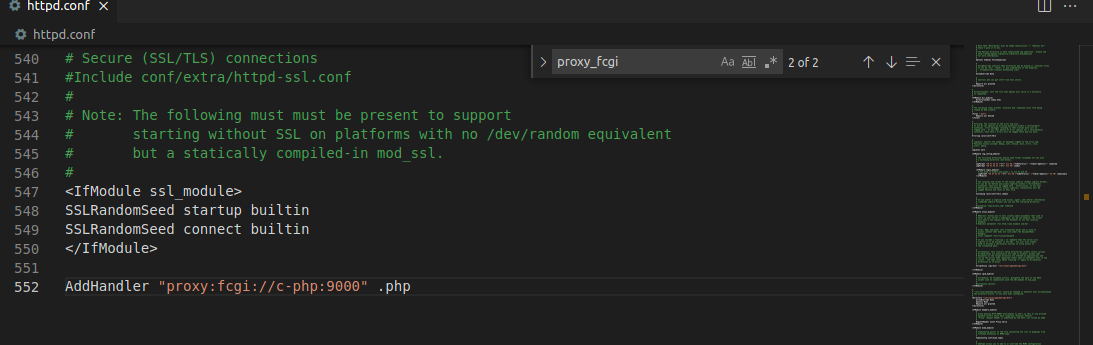
Máy chủ apache được tạo ra sẽ tạo những file php thông qua proxy, tức là khi ta truy vấn đến những file có phần mở rộng là .php apache sẽ yêu cầu server chạy php-fpm để thi hành file php đó. Để sử dụng proxy cho apache, ta cần phải nạp các module về proxy cụ thể :
Bật một số module sau trong file httpd.conf:
- module
mod_proxy.so và mod_proxy_fcgi.so

Thêm AddHandler
Thêm AddHandler để chỉ thị apache chạy php thông qua proxy. Ta thêm dòng lệnh sau vào cuối file:
1
|
AddHandler "proxy:fcgi://ip:9000" .php
|
trường hợp này, ta truy vấn để container c-php nên ở ip ta thay thành c-php và cổng vẫn là 9000
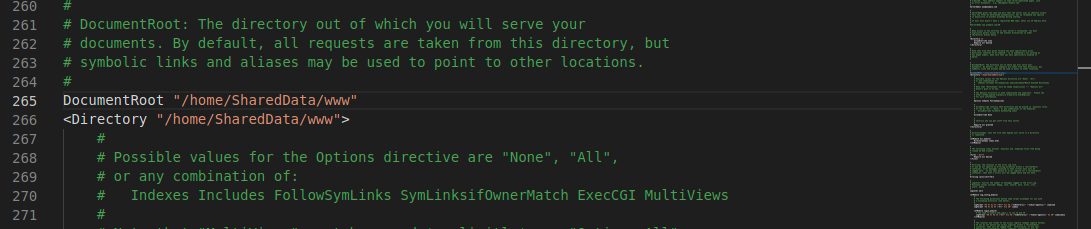
Thiết lập thư mục mặc định của apache
Để thiết lập thư mục mặc định khi chúng ta share, chúng ta sẽ thay đổi ở
1
2
|
DocumentRoot "/usr/local/apache2/htdocs"
<Directory "/usr/local/apache2/htdocs">
|
Thay đổi thành thư mục mà chúng ta muốn mount vào.
Chạy máy chủ Http Apache
Ta chạy câu lệnh:
1
|
docker run --network www-net --name c-httpd -h httpd -p 9999:80 -p 443:443 -v /home/edisc/Desktop/docker/data:/home/SharedData -v /home/edisc/Desktop/docker/data/httpd.conf:/usr/local/apache2/conf/httpd.conf httpd
|
Ở đây:
- Ta chạy một container có tên là
c-httpd với hostname là httpd kết nối mạng www-net.
- Ánh xạ cổng
80, 443 của container lần lượt lên cổng 9999, 443 của máy host.
- Thư mục chia sẻ dữ liệu
/home/edisc/Desktop/docker/data trên máy host được ánh xạ lên /home/SharedData trên container, và file cấu hình httpd.conf cũng được ánh xạ vào /usr/local/apache2/conf/httpd.conf.
Ở đây lưu ý, khả năng chúng ta sẽ bị lỗi
1
2
|
docker: Error response from daemon: driver failed programming external connectivity on endpoint c-httpd (e0fa76873fc8a5b1b73a0e9589774a25d7a7c377a777d3af6c5313bf7c44adc7): Error starting userland proxy: listen tcp 0.0.0.0:443: bind: address already in use.
ERRO[0000] error waiting for container: context canceled
|
Tức là cổng mà chúng ta ánh xạ trên máy host đã được sử dụng bởi một tiến trình nào đó. Lúc bây giờ có 2 cách giải quyết:
- Chọn cổng khác trên máy host
- Tìm các ứng dụng sử dụng cổng này rồi kill nó đi. Để tìm các cổng sử dụng ta dùng lệnh
sudo netstat -pna | grep 443 với 443 là port mình cần tìm.
Ta được kết quả.
1
2
3
4
5
6
7
|
❯ docker run --network www-net --name c-httpd -h httpd -p 9999:80 -p 443:443 -v /home/edisc/Desktop/docker/data:/home/SharedData -v /home/edisc/Desktop/docker/data/httpd.conf:/usr/local/apache2/conf/httpd.conf httpd
[Thu Jun 10 08:10:54.751670 2021] [proxy_html:notice] [pid 1:tid 139955972379776] AH01425: I18n support in mod_proxy_html requires mod_xml2enc. Without it, non-ASCII characters in proxied pages are likely to display incorrectly.
AH00558: httpd: Could not reliably determine the server's fully qualified domain name, using 172.23.0.2. Set the 'ServerName' directive globally to suppress this message
[Thu Jun 10 08:10:54.767249 2021] [proxy_html:notice] [pid 1:tid 139955972379776] AH01425: I18n support in mod_proxy_html requires mod_xml2enc. Without it, non-ASCII characters in proxied pages are likely to display incorrectly.
AH00558: httpd: Could not reliably determine the server's fully qualified domain name, using 172.23.0.2. Set the 'ServerName' directive globally to suppress this message
[Thu Jun 10 08:10:54.771929 2021] [mpm_event:notice] [pid 1:tid 139955972379776] AH00489: Apache/2.4.48 (Unix) configured -- resuming normal operations
[Thu Jun 10 08:10:54.772004 2021] [core:notice] [pid 1:tid 139955972379776] AH00094: Command line: 'httpd -D FOREGROUND'
|
Kiểm tra apache
Như vậy ở bước trên máy chủ apache của chúng ta đã chạy. Để kiểm tra, ta tiến hành mở trình duyệt 127.0.0.1:9999 hoặc localhost:9999
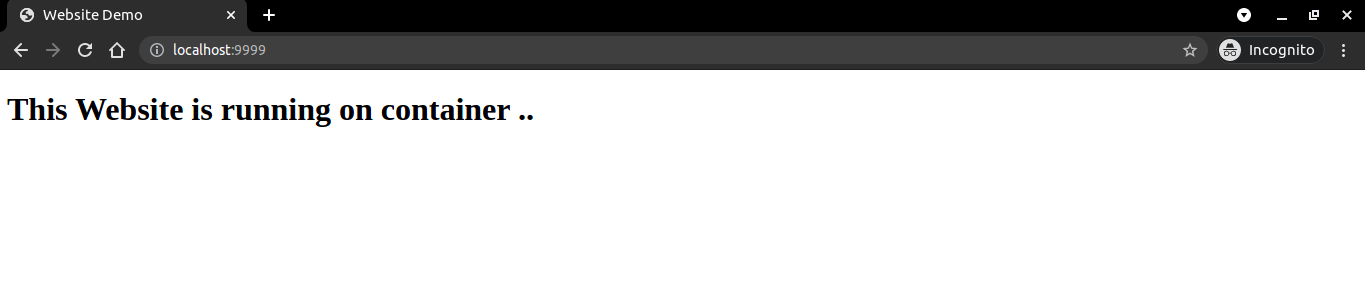
Như vậy, máy chủ apache đã hoạt động hiệu quả. Chúng ta gọi file php để xem proxy có hoạt động không
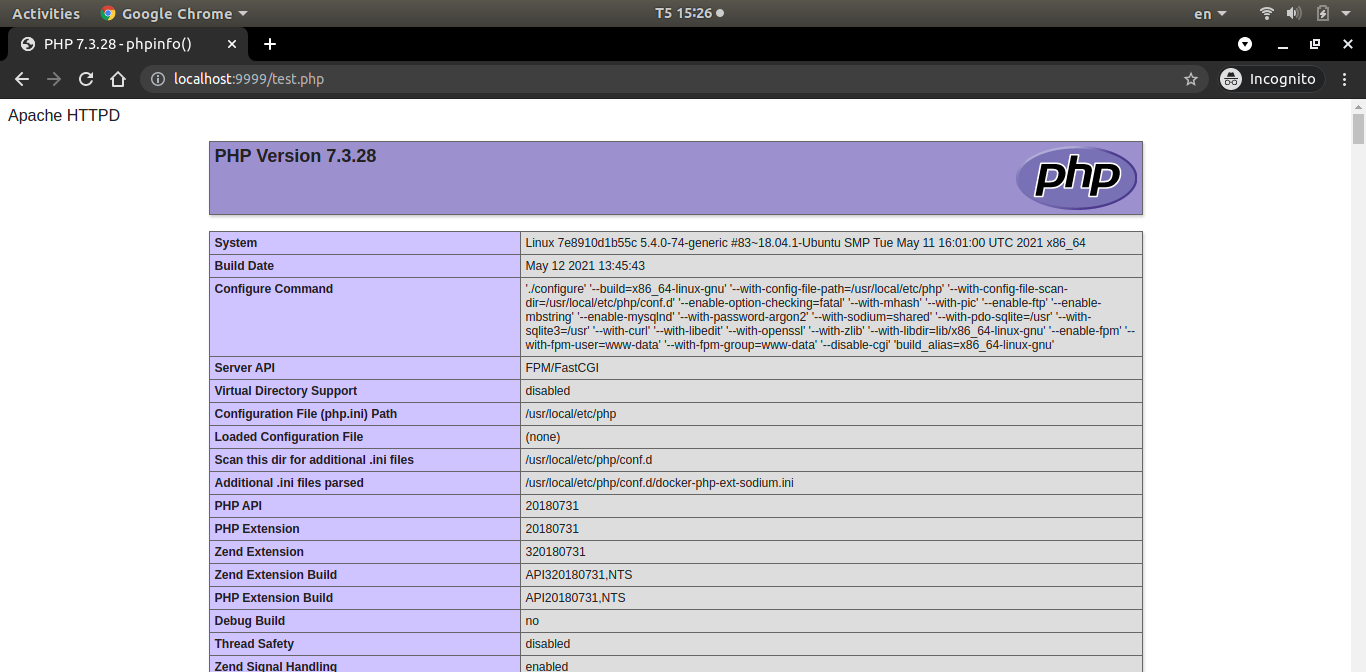
Như vậy, proxy đã gọi được test.php.
Cài đặt, chạy MySQL bằng Docker
Trong 2 phần trước, chúng ta đã tạo được 2 container, một container chạy php và một container chạy server apache httpd. Phần này chúng ta sẽ tiến hành cài đặt và chạy MySQL bằng Docker.
Thiết lập biến môi trường cho container
Docker cho phép chúng ta thiết lập các biến môi trường cho container thông qua tùy chọn -e. Ví dụ, ta chạy một container từ image busybox, trong đó, thiết lập các biến môi trường cho container:
1
2
3
4
5
6
|
❯ docker run -it --rm -e BIEN1=VALUE1 -e BIEN2="VALUE2" busybox
/ # echo $BIEN1
VALUE1
/ # echo $BIEN2
VALUE2
/ #
|
Đây là cách thức nhiều image đóng gói và thiết lập biến môi trường giúp chúng ta thiết lập các container khi chạy.
Tải về phiên bản mysql
Chúng ta tải phiên bản mới nhât của mysql bằng lệnh docker pull
 1
 2
 3
 4
 5
 6
 7
 8
 9
10
11
12
13
14
15
16
17
18
19
20
21
22
23
24
25
26
27
|
❯ docker pull mysql
Using default tag: latest
latest: Pulling from library/mysql
69692152171a: Already exists
1651b0be3df3: Pull complete
951da7386bc8: Pull complete
0f86c95aa242: Pull complete
37ba2d8bd4fe: Pull complete
6d278bb05e94: Pull complete
497efbd93a3e: Pull complete
f7fddf10c2c2: Pull complete
16415d159dfb: Pull complete
0e530ffc6b73: Pull complete
b0a4a1a77178: Pull complete
cd90f92aa9ef: Pull complete
Digest: sha256:d50098d7fcb25b1fcb24e2d3247cae3fc55815d64fec640dc395840f8fa80969
Status: Downloaded newer image for mysql:latest

❯ docker images
REPOSITORY          TAG                 IMAGE ID            CREATED             SIZE
newimage            version2            a8e04dcf8737        2 days ago          170MB
busybox             latest              69593048aa3a        2 days ago          1.24MB
httpd               latest              39c2d1c93266        2 weeks ago         138MB
php                 7.3-fpm             2692864592ed        4 weeks ago         399MB
mysql               latest              c0cdc95609f1        4 weeks ago         556MB
ubuntu              latest              7e0aa2d69a15        6 weeks ago         72.7MB
centos              latest              300e315adb2f        6 months ago        209MB
|
Một số thông tin chính cần chú ý trước khi bắt đầu làm việc với mysql:
- port:
3384
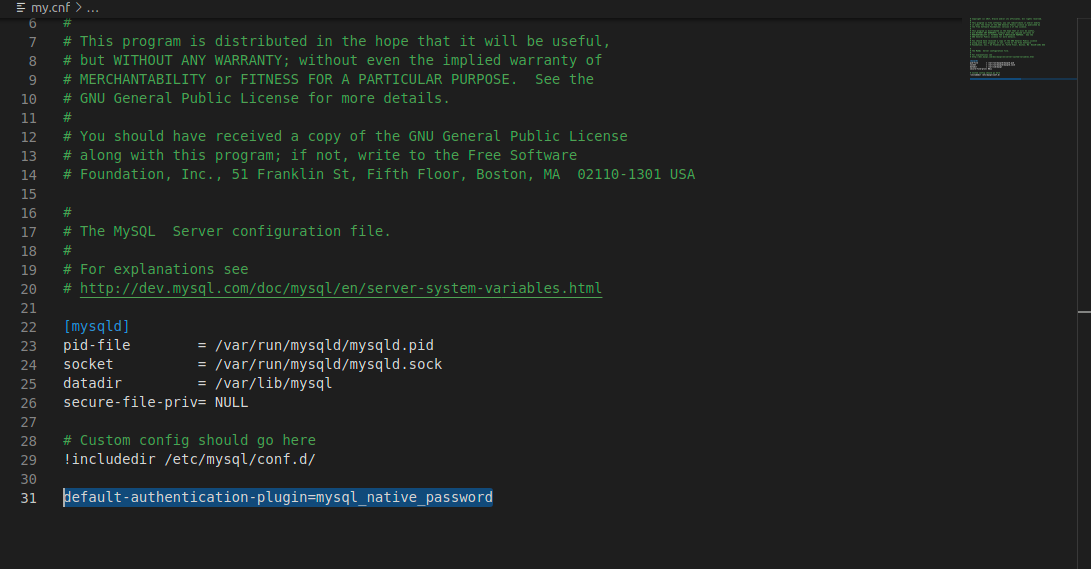
- MYSQL 8.0 có thể có một số máy cũ không hỗ trợ, có thể cần cấu hình để hệ thống cũ có thể login vào mysql này. khi đó ta thêm vào file config nội dung sau:
[mysqld]
default-authentication-plugin=mysql_native_password
- file config:
/etc/mysql/my.cnf của container
- Biến môi trường:
- Tài khoản
root:MYSQL_ROOT_PASSWORD
- database:
/var/lib/mysql
Lấy file cấu hình my.cnf
Chúng ta chạy file mysql và trích xuất file my.cnf ra.
1
2
3
|
❯ docker run --rm -v /home/edisc/Desktop/docker/data:/home/SharedData mysql cp /etc/mysql/my.cnf /home/SharedData/
❯ ls
c1.txt  data_container2.txt  d.txt  httpd.conf  my.cnf  www
|
Cấu hình file my.cnf
1
|
default-authentication-plugin=mysql_native_password
|
vào cuối file my.cnf
- Tạo thêm thư mục
db trong folder /home/edisc/Desktop/docker/data để lưu trữ dữ liệu, đồng thời khi xóa container đi thì csdl của nó cũng không bị mất đi.
Tạo container mysql
Chúng ta tạo docker để chạy mysql, trong đó:
- Thiết lập biến môi trường để lưu mật khẩu cho tài khoản root, mật khẩu ta chọn là
docker123:
-e MYSQL_ROOT_PASSWORD=docker123,
- Ánh xạ file cấu hình
my.cnf lên thực mục cấu hình trên container:
-v /home/edisc/Desktop/docker/data/my.cnf:/etc/mysql/my.cnf,
- Ánh xạ thư mục
db trên host lên thư mục lưu trữ databse mặc định của container:
-v /home/edisc/Desktop/docker/data/db:/var/lib/mysql
- Tên là c-mysql:
--name c-mysql
 1
 2
 3
 4
 5
 6
 7
 8
 9
10
11
12
13
14
15
16
17
18
|
❯ docker run -e MYSQL_ROOT_PASSWORD=docker123 -v /home/edisc/Desktop/docker/data/my.cnf:/etc/mysql/my.cnf -v /home/edisc/Desktop/docker/data/db:/var/lib/mysql --name c-mysql mysql
2021-06-10 09:02:24+00:00 [Note] [Entrypoint]: Entrypoint script for MySQL Server 8.0.25-1debian10 started.
2021-06-10 09:02:25+00:00 [Note] [Entrypoint]: Switching to dedicated user 'mysql'
2021-06-10 09:02:25+00:00 [Note] [Entrypoint]: Entrypoint script for MySQL Server 8.0.25-1debian10 started.
2021-06-10 09:02:25+00:00 [Note] [Entrypoint]: Initializing database files
2021-06-10T09:02:25.233559Z 0 [System] [MY-013169] [Server] /usr/sbin/mysqld (mysqld 8.0.25) initializing of server in progress as process 43
2021-06-10T09:02:25.244471Z 1 [System] [MY-013576] [InnoDB] InnoDB initialization has started.
2021-06-10T09:02:26.680645Z 1 [System] [MY-013577] [InnoDB] InnoDB initialization has ended.
2021-06-10T09:02:29.942913Z 6 [Warning] [MY-010453] [Server] root@localhost is created with an empty password ! Please consider switching off the --initialize-insecure option.
2021-06-10 09:02:38+00:00 [Note] [Entrypoint]: Database files initialized
2021-06-10 09:02:38+00:00 [Note] [Entrypoint]: Starting temporary server
2021-06-10T09:02:39.196368Z 0 [System] [MY-010116] [Server] /usr/sbin/mysqld (mysqld 8.0.25) starting as process 88
2021-06-10T09:02:39.243106Z 1 [System] [MY-013576] [InnoDB] InnoDB initialization has started.
2021-06-10T09:02:39.910377Z 1 [System] [MY-013577] [InnoDB] InnoDB initialization has ended.
2021-06-10T09:02:40.126089Z 0 [System] [MY-011323] [Server] X Plugin ready for connections. Socket: /var/run/mysqld/mysqlx.sock
2021-06-10T09:02:40.376702Z 0 [Warning] [MY-010068] [Server] CA certificate ca.pem is self signed.
2021-06-10T09:02:40.377098Z 0 [System] [MY-013602] [Server] Channel mysql_main configured to support TLS. Encrypted connections are now supported for this channel.
...
|
Chúng ta không thiết lập tham số ánh xạ cổng vì ở đây chưa có nhu cầu truy cập từ bên ngoài vào csdl c-mysql mà csdl này chỉ để cho c-php và c-httpd truy cập thông qua cổng 3306. Trong thực tế, chúng ta muốn truy cập từ xa, để các server kết nối với nhau, ta cần ánh xạ cổng 3306 này tới máy host.
Thi hành một số lệnh trong container c-mysql
Đến đây, chúng ta đã thiết lập được một container chạy mysql, tiếp theo chúng ta vào container trên để chạy một số câu lệnh để kiểm tra.
Vào container c-mysql
Đầu tiên, vào container c-mysql bằng lệnh docker exec:
1
2
3
4
5
6
7
|
❯ docker ps
CONTAINER ID        IMAGE               COMMAND                  CREATED             STATUS              PORTS                                        NAMES
10c415b14dbe        mysql               "docker-entrypoint.s…"   5 minutes ago       Up 5 minutes        3306/tcp, 33060/tcp                          c-mysql
7e8910d1b55c        php:7.3-fpm         "docker-php-entrypoi…"   43 minutes ago      Up 43 minutes       9000/tcp                                     c-php
a9d05fe2fc94        httpd               "httpd-foreground"       About an hour ago   Up 34 minutes       0.0.0.0:443->443/tcp, 0.0.0.0:9999->80/tcp   c-httpd
❯ docker exec -it c-mysql bash
root@10c415b14dbe:/#
|
Kết nối với mysql
mysql của chúng ta có username là root và có password là docker123 (thiết lập ở trên). Tham số -pdocker123 giúp chúng ta không cần phải nhập lại password.
 1
 2
 3
 4
 5
 6
 7
 8
 9
10
11
12
13
14
15
|
root@10c415b14dbe:/# mysql -u root -pdocker123
mysql: [Warning] Using a password on the command line interface can be insecure.
Welcome to the MySQL monitor.  Commands end with ; or \g.
Your MySQL connection id is 8
Server version: 8.0.25 MySQL Community Server - GPL

Copyright (c) 2000, 2021, Oracle and/or its affiliates.

Oracle is a registered trademark of Oracle Corporation and/or its
affiliates. Other names may be trademarks of their respective
owners.

Type 'help;' or '\h' for help. Type '\c' to clear the current input statement.

mysql>
|
Như vậy chúng ta đã kết nối được mysql và vào bên trong của sql-server.
Kiểm tra có những database nào trong mysql
 1
 2
 3
 4
 5
 6
 7
 8
 9
10
11
|
mysql> show databases;
+--------------------+
| Database           |
+--------------------+
| information_schema |
| mysql              |
| performance_schema |
| sys                |
+--------------------+
4 rows in set (0.00 sec)
mysql>
|
Sử dụng database mysql
1
2
3
4
5
6
|
mysql> use mysql;
Reading table information for completion of table and column names
You can turn off this feature to get a quicker startup with -A

Database changed
mysql>
|
Show table
 1
 2
 3
 4
 5
 6
 7
 8
 9
10
11
12
13
14
15
16
17
18
19
20
21
22
23
24
25
26
27
28
29
30
31
32
33
34
35
36
37
38
39
40
41
42
43
|
mysql> show tables;
+------------------------------------------------------+
| Tables_in_mysql                                      |
+------------------------------------------------------+
| columns_priv                                         |
| component                                            |
| db                                                   |
| default_roles                                        |
| engine_cost                                          |
| func                                                 |
| general_log                                          |
| global_grants                                        |
| gtid_executed                                        |
| help_category                                        |
| help_keyword                                         |
| help_relation                                        |
| help_topic                                           |
| innodb_index_stats                                   |
| innodb_table_stats                                   |
| password_history                                     |
| plugin                                               |
| procs_priv                                           |
| proxies_priv                                         |
| replication_asynchronous_connection_failover         |
| replication_asynchronous_connection_failover_managed |
| role_edges                                           |
| server_cost                                          |
| servers                                              |
| slave_master_info                                    |
| slave_relay_log_info                                 |
| slave_worker_info                                    |
| slow_log                                             |
| tables_priv                                          |
| time_zone                                            |
| time_zone_leap_second                                |
| time_zone_name                                       |
| time_zone_transition                                 |
| time_zone_transition_type                            |
| user                                                 |
+------------------------------------------------------+
35 rows in set (0.00 sec)

mysql>
|
Tạo dữ liệu
 1
 2
 3
 4
 5
 6
 7
 8
 9
10
11
12
13
14
15
16
17
18
19
20
21
22
23
24
25
26
27
28
29
30
|
mysql> CREATE USER 'testuser'@'%' IDENTIFIED BY 'testpass';
Query OK, 0 rows affected (0.03 sec)

mysql> create database db_test;
Query OK, 1 row affected (0.02 sec)

mysql> show databases;
+--------------------+
| Database           |
+--------------------+
| db_test            |
| information_schema |
| mysql              |
| performance_schema |
| sys                |
+--------------------+
5 rows in set (0.00 sec)

mysql> select User from user;
+------------------+
| User             |
+------------------+
| root             |
| testuser         |
| mysql.infoschema |
| mysql.session    |
| mysql.sys        |
| root             |
+------------------+
6 rows in set (0.00 sec)
|
Như vậy ta có các user là: root và testuser. Với testuser có password là testpass.
Kết luận
Trong bài học này, chúng ta đã học được từ anh XuanThuLabChanel cách cấu hình ra 3 container chạy 3 dịch vụ khác nhau: mysql, php, máy chủ web apache httpd. trong đó máy chủ web truy cập được cổng 9999 trên host. Trong bài tiếp theo, chúng ta sẽ cài đặt wordpress vào hệ thống này.